Sunday, May 13, 2012

Simple Crochet Potholder

For Mother's Day I crocheted my mother-in-law a potholder.
I finished in on Monday (May 7th), but didn't want to post until today, just in case she checks my blog-- It would have ruined the surprise!

I simply created a giant rectangle and folded it in half (hamburger style) to get double the thickness, the sealed the edges (only three edges) with half double crochet.


This is the giant rectangle before I folded it.

I did the edges in a contrasting bright red.

Compare the size to the crochet hook.

An "action shot"!

Now, for the details:

I used Patons Classic Wool Taupe for the body of the potholder, and Patons Classic Wool Bright Red for the border.  It is 100% pure new wool, so it ought to be good for use in the kitchen, and can be washed in cool to warm water (lay flat to dry).
A 4.5mm (size 7) crochet hook worked very well for me, but I am sure a 5mm (size 8) would be fine too.

To make it:
Chain 52.
1st row: 1 double crochet in 3rd chain from hook (counts as 2 double crochet). 1 double crochet in each chain to end of chain. Chain 2, and turn.
2nd row: 1 double crochet on top of the very end of the section that you just finished. What I mean is skip over two you chained. 1 double crochet in each section to the end. Chain 2, and turn.
Keep repeating until you get 18 rows total!

Then fold over the rectangle hamburger-style. Look for the edge opposite your original chain. This is the easiest edge to begin sealing the edge, since the double crochet leaves you with neat holes to insert your crochet hook.
Make sure you have folded right down the middle, and start "sealing" by half double crocheting in each double crochet (remember to go through both of the layers).
When you get to the end of the "top," chain to get a nifty loop to hang up your potholder.
Connect the loop with a slip stitch.
Half double crochet down the side and continue across the bottom.
When you seal up the bottom, you are done!

Monday, April 30, 2012

Simple DIY alterations and fixes to store-bought clothes

Have you gotten some clothes that looked cute in the store, but then end up not wearing them for one reason or another?  I have a few items that I put into a storage bin because I wasn't wearing them.  Recently, due to the nice warm weather we've been having, I switched out my cold-weather clothes for warm-weather clothes, and rediscovered these items in my storage bin.

As I looked these items over, I realized that I stopped wearing them for very simple reasons.  Not only that, all of the problems that I had with these clothes were problems that could be fixed with sewing!

For example, the top button of the teal dress below wouldn't stay closed reliably, and I became so self-conscious when wearing it (I would look down and check all the time to make sure I was still buttoned) that I just stopped wearing it.

With my new-found confidence in sewing, I decided that I would fix this particular problem with a hidden sew-on snap button right above the top button.

These are the sew-on snaps I picked up, in size 3/0 (the smallest).

The sew-on snap button completely fixes the problem and it only took a few minutes to do this fix!
Even better, the ruffles on the bust of this dress hide the thread, so it is completely invisible from the outside.


Another item I found in my storage bin was an orange tank top.  I bought this orange tank top in Japan several years ago, but I stopped wearing it because the overlapping edges of the V-neck did not provide sufficient coverage, and my bra was often visible if you looked at the side with the opening.


This was another super-easy fix.  After confirming that I would still be able to get the top on if the overlapping edges were sewn together (I used a safety pin to pin the edges together, and tried putting on and taking off the top), all I had to do was stitch the overlapped part down.  I decided to go with orange topstitching to match the ribbon in the middle.  Another piece revived!

Can you see the orange stitching?
I also dug up an old pajama top.  I wore it so many years that the elastic had lost all of its elasticity.

You can't even tell that it has elastic attached to it!


The elastic was old, yellow, and generally totally gross.
I removed all of the old elastic with a seam ripper, and sewed in new elastic in its place.  (1/8" elastic that you can find at your local sewing/crafts store.)

VoilĂ !  It looks like it did 7 years ago!

I also found some denim shorts that I wore so much that holes developed below the back pockets!  This fix didn't even require sewing.  All I had to do was iron on some patches on the inside to reinforce the weak area.  The patches are also readily available at Jo-Ann or your local sewing/crafts store.  Iron on high heat (dry iron) for 40 seconds to set it, and it's done!

I positioned the patches to cover the weakest parts (where the denim had worn thin).
You can't see the patches from the outside.  You can only white threads where the two holes used to be.  I don't mind having those threads there.  If you mind, then it might be trickier to fix your shorts.


These shorts will be good for another few years now.

A couple of years ago I bought Martin-fit gray pants at Banana Republic in the petite size/length.  At the time I thought they fit, but soon after getting them I realized they were too short and looked ridiculous.  (They might have shrunk a little in the wash, too, contributing to the problem.)
Looking at these pants again I was inspired to redo the bottom hem.

Pin the hem up while wearing the pants for the best results!

It was even easier than expected.  The Martin fit luckily has an extra rolled up layer at the bottom, so I had enough length/fabric to work with.
The blind hem setting on my sewing machine took care of it.

You can only see the stitching on the inside of them hem-- on the outside it is almost completely invisible.
 Last but not least, after years of use, the strap on my strapless bra had stretched out, rendering the bra pretty much useless.  (Who wants to have to find a private spot every few hours to adjust your bra to keep it from sliding down too far?)
I was getting ready to buy a new one when I suddenly realized that I might as well try to fix the old one.


Step 1 & 2: use a seam ripper to remove the ends gently (you're going to reattach them).  Cut off the right amount from each side, keeping in mind you have to trim both sides.

Step 1 & 2 on the other side.

Step 3:  In most cases, trimming off some fabric will mean that the width is not the same as the hook closure anymore.  You will have to gather the fabric to make it fit.  Baste close to the edge using the longest length stitch you can, and pull to gather the fabric.

Step 4: Use fabric glue if you have some to reattach the ends, then zigzag all around to secure them.

The other side, finished.
 It is very gratifying to have regained all of these items of clothing with a few simple DIY alterations and fixes!


Sunday, April 15, 2012

Modestly layer (lace!) and PJ pattern adjustments

As I mentioned in my previous post, the cowlneck top I made dipped a little too low.  I decided to sew in a permanent "modesty layer" so I don't have to wear a camisole under the top.
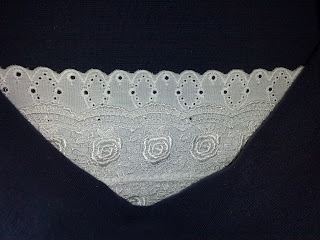
I went to Jo-Ann's and got 1/2 yd of two types of lace: eyelet lace on a band of some gathered white cloth (mildly ruffled), and heavier lace with a rose design.  When I got home, I undid the gathers, flattened by pressing, and sewed the two together to get a more opaque look.   Then I trimmed the lace to fit inside the cowlneck top and sewed it in.

How it looks from the front.


 Unfortunately I had miscalculated a little and lace was not wide enough to extend as low as I needed it to go, so I zig-zagged two pieces together.  Luckily you can't really tell from the outside, but you can see it from the inside:


I also started working on a flannel PJ set.  Looking over the pattern pieces (Simplicity 2317) I realized I needed to shorten the shoulders quite a bit.  It was harder than I originally thought it was going to be, because I had to adjust all the pieces that would be affected (it ended up being most of the pieces!) while keeping in mind how they are going to fit together.  Due to the shortening the front facing piece (#19) lost the angled part that will become the lapel of the collar, so I had to reconstruct that part.  I tried my best...we'll see if my pattern adjustments will work when I get to the sewing phase!


Monday, April 9, 2012

Cowlneck T-shirt

Today I finished sewing a cowlneck t-shirt in navy blue stretchy knit fabric.  I used Vogue pattern V8634.  I originally cut out the pattern in S size, but thanks to my previous experience with the grey tank top I realized by comparing the pattern pieces that I needed to size down to XS.  I reduced all of the pattern piece sizes to XS, with the exception of the hip measurement, which I kept at S, since my hip measurement is 34 and 1/2 inches.  Once you have a pattern in your size (which you have adjusted as necessary, I would recommend that you always compare new patterns to this trusty pattern-- I saved a lot of time doing this!)

The flash makes this look very bright, but it is a dull navy blue color.

A close-up of the cowlneck.  You can see some of the topstitching.

The project took much less time thanks to some time-saving devices.  I invested in a rotary cutter (OLFA 45mm) and it reduced my prep time by at least half!  Be sure to get the mat if you want to use a rotary cutter.  It's pricey but in my opinion 100% worth it.  The rotary cutter was even more versatile than I thought it would be-- I was able to cut free form (without a guiding straight-edge), and it handled curves without any problems.

I also highly recommend pressing with a tailor's ham and sleeve roll.  These simple rounded objects really helped me achieve a cleaner look and allowed me to get into the hard-to-reach areas (such as seams under the arm and curved seams).

I used the same settings on my sewing machine and serger as I did for my previous stretchy knit fabric project (the grey tank top and shorts set) and didn't have any problems.


3/4 angle view.


The neckline dips quite low so I would recommend a camisole underneath.
One thing that wasn't obvious from the pattern package was that the design results in a low neckline.  I felt uncomfortable so I put on a camisole underneath.  I am considering getting some lace from the store and sewing in a permanent layer for modesty.

Simple, clean lines give this shirt a more dressy look.
I can see myself pairing this shirt with a skirt, or maybe some white pants/jeans.

Monday, March 19, 2012

Tank top and shorts finished

It has been awhile since I last updated, hasn't it?  I've been busy with some translations in the last couple of weeks and haven't had as much time for sewing.  However, I was still able to fit in a few hours to finish the tank top and shorts set that I've been working on!  I used Simplicity pattern 2317 (for people who have similar measurements to me and are interested in making the same garments, I should mention that I had to make a lot of adjustments to the base pattern to make it fit right).

The finished tank top and shorts set. 

A close-up of the shorts.

I used an overlock machine/serger to finish the hem on the shorts. 

As I mentioned in a previous post, my husband got me an overlock machine/serger for my birthday.  I am now the proud owner of a Brother 1034D.  It was very easy to learn how to use it, and the machine comes with a useful manual and some how-to videos that you can watch on your computer.  The narration for the videos has a forced "cheery" feel to it, which I found unpleasant, but overall the videos were worth watching, as they explain various techniques, including blind hem, rolled edge, gathering, and making spaghetti straps, etc.

Before I had my nifty serger, I had to zigzag any edges that would be exposed in the finished garment before sewing the seams.  The serger sews the seam (the 4-thread setting even sews a reinforcing line), snips off extra fabric, and finishes the seam beautifully all in one pass-through, and at an impressive speed-- noticeably faster than the sewing machine.

Of course, the sewing machine is still essential, but I definitely found that the Brother 1034D cut down on my garment construction time.


Making the shorts was a good learning experience.  I tried hemming with the serger for the first time.  You can see the shorts here:


An "action shot" of the shorts.
With flash.
Sewing machine settings were the same as the ones I used for the tank top: I stuck with the 90/14 HG-4BR (Organ) ball point needle, and for all straight-line sewing I used the stretch stitch (#02) with the standard presser foot, changing the stitch length to the maximum.

Serger settings: standard 4-thread overlock on exposed seams (except the hem).  All thread tensions were set to 4, and the differential feed was set to 1.5 to accommodate the stretchy knit fabric.  The stitch length and width were set to the default.  I didn't have extra ball point needles, but it probably would have been a good idea to replace both needles with ball point needles.
For the hem, I used the blind hem presser foot.  The blind hem is a 3-thread stitch, so I removed the right needle.  I also adjusted the tension dials to 3-0-6-3.  (The left needle tension is lowered, the upper looper tension is raised, and the lower looper tension is lowered.)  At first I followed the recommendations in the manual for the left needle tension (in between 0 and 2), but it wasn't working very well for me.  I found that raising the needle tension to 3 really helped resolve the problems I was having.  I left the differential feed, stitch length, and stitch width settings the way they were.  The higher needle tension resulted in there being a line visible on the outside (the "right" side) of the garment, but I actually liked the way this looked and decided to stick with it.

Finally, I wasn't fully satisfied with the way the tank top was fitting, so I made some more alterations.  The straps were way too loose.  (This was also contributing to the armholes appearing too large.)  I used my seam ripper to open up the seams where I had sewed the back to the front, and cut off 1.25 inches off of each of the 4 ends.  (2.5 inches on each side total!)  After making this adjustment the tank top finally fit right.
This is the whole outfit.

The back of the outfit.

Side view.
After a lot of alterations, I was finally satisfied with the tank top.  I made sure to transfer all of the changes I had made to the original pattern pieces so the next time I make something with those pattern pieces they will be correct.  The shorts pattern pieces didn't need any changes.

Sunday, February 26, 2012

Slow-clothing

I don't have any project updates, but want to share something I've been thinking about.

We are fortunate enough to live at a time when, if you don't want to get all of your food from the large-scale industrial/commercial farming system, there are alternatives.  It is possible for people to get fresh, local, organic vegetables and fruits from farmers' markets, locally baked breads and pastries, and even meat from animals that have been raised humanely/responsibly and without use of antibiotics, hormones, etc.  In other words, there are alternative food sources for people who don't want to participate in the agricultural-industrial complex.

There don't seem to be many alternative sources for people who want to "opt out" when it comes to clothing.  Sure, there are a few places that sell hippie organic cotton (or hemp, or bamboo) t-shirts and pants, and American Apparel and New Balance and a handful of other companies still manufacture in the U.S., but there isn't the widespread availability of alternative sources like you have for food.  The few sources that do exist don't exactly cover the fashion spectrum, especially for those of us who like to dress chic or fashionably.  And American Apparel and New Balance aren't exactly "local" or "community supported" in the same sense that a farmer's market or farming cooperative is.  The vast majority of ready-to-wear clothing bought in the U.S. is made in a factory overseas, where the cost of manufacturing is lower (and the working conditions are potentially sub-par).

The slow-food movement has a lot of devotees.  Alice Waters has her own cult following.  Michael Pollan's books have been national bestsellers.
Yet when it comes to clothing there isn't any movement out there of the same scale promoting the same kind of ideology.  

I did a quick Google search and found that in the spirit of slow-food, slow-clothing was founded in 2006, but it didn't seem to take off to the same extent as slow-food.

I think it is worthwhile to re-approach the idea of celebrating clothing made from environmentally sound materials, made in conditions that don't entail human suffering, and made to fit.

About that last bit.  Clothing is really best tailored to fit the wearer's body.  It's amazing how much of a difference it makes when clothes actually fit right.  Celebrities and the rich are well aware of this and have all of their clothing tailored.  
The ready-to-wear items that most people buy often don't fit that well, because people come in all sizes and shapes, and the clothing doesn't.  Ready-to-wear clothes are made based off of what the clothing industry thinks will fit the average person, but few of us can take something off the rack and have it fit perfectly.  Unless you happen to be the same size and shape as the fit model, there is likely going to be at least one area that doesn't fit right.  Maybe the waist is too roomy, but the hip and thigh area is tight, or you are too short and the pants/dress/skirt needs to be hemmed.  Maybe clothing companies don't even make clothes in your size (anybody who is super petite or on the taller/larger side can sympathize with this).

I started this blog to document my progress towards making my own clothes, with some of these thoughts in my mind.  
Not everyone who is frustrated with the modern clothing and fashion industry is similarly interested in making their own clothes.  Why aren't there alternatives for them?  Is it because it is not economically viable?  Am I mistaken in thinking that some people would happily pay more for "slow-clothing"?  And I don't mean Parisian couture-house prices (think Chanel, Christian Dior, Givenchy, Jean Paul Gaultier, etc.), I mean prices that regular people could afford to pay.
I'd like to explore this in tandem with my forays into clothing-making, but I'm not exactly sure how to approach it.

My husband thinks we should make machines that make perfectly tailored clothes.  You feed the machine your measurements (or better yet, the machine measures you) and the machine creates the clothes, removing the human labor component.  It seems like a pretty cool idea, but you might lose out on the special one-of-a-kind feeling you get from something handmade...

Saturday, February 25, 2012

Gray scarf and gray tank top

Sorry for the long hiatus.  I went to Costa Rica with my husband for the first half of February (our honeymoon) and am just getting back into the swing of things now.


I wasn't completely negligent on our vacation though-- I finished the scarf I was knitting on our return flight.  *(^_^)*
Here is what it looks like:

You can't tell from the picture, but it a respectable length: 78 inches.
The width is 5 3/4 inches.
It was my first knitted project, so I stuck to one color and just focused on creating texture with knit and purl.

I made it with Loops and Threads True Gray (100% acrylic) and knitting needles size 8 (5mm)
Steps:
26 cast on.
3 rows of stockinette stitch (just for a little border like section at the ends-- it rolls a little).
Alternate sections of garter stitch (10 "stripes") and moss stitch (9 "stripes"):
For the garter stitch I knitted until I counted 15 of the bumpy s shaped lines. (Each of these bumpy lines was actually made up of two knitted rows, one on the right side, and one on the wrong side.)
For the moss stitch I did:
1st row: knit all in the row
2nd row: purl, knit, *repeat until end of row
3rd row: knit all in the row
4th row: knit, purl, *repeat until end of row
Repeat 1 through 4 seven times until you have 28 rows.
End with 3 rows of stockinette stitch and bind off.

With a little simple arithmetic, I calculated that there are are a total of 14,560 individual "stitches"!
I am proud of myself for sticking to the project and completing it.

I have also completed my first article of "everyday" clothing-- the racerback tank top from Simplicity 2317! I was close to finishing before we left for Costa Rica, but when I tried it on the armholes were too big and I had to snip off some more fabric, so I didn't actually finish it until today. Next time I make something I'll baste it and try it on before I proceed to the final sewing (it would have saved me a lot of time and prevented the frustration of seam ripping and pulling out tiny little pieces of thread).
It's not much to brag about, but I can wear it.
I just finished sewing this tank top.

This is the back.
I used the following settings on my Brother CS-6000i:
90/14 HG-4BR (Organ) ball point needle

For single layer unfinished edges, I used the standard overcast stitch (#06) with the overcast presser foot.
For all straight-line sewing, I used the stretch stitch (#02) with the standard presser foot, changing the stitch length to the maximum.
For the neckline, armholes, and bottom hem, I sewed a straight-line "guideline"stitch (distance from the edge = twice the seam allowance), pressed the cloth to the correct seam allowance, and then finished with the stretch overcast stitch (#08)-- standard presser foot.


For my birthday my husband got me a serger!  I am super super excited about this new piece of equipment.  I spent some time today playing with it (learning how to thread it and adjust it for stretchy knit fabrics) and from just a few hours I can tell it is going to cut down on construction time significantly.